
Google Forms, used as it is intended, is a tremendous tool but with add-ons, it can become even more powerful. One of the ways that I have found for using Google Forms is to help students and staff monitor the blood sugar levels of diabetic students.
 In my district, we have one school nurse for four different buildings spread across the district. To better help her monitor those students with medical needs, I created a Google Form that allows multiple staff members, as well as the parents of those students, to keep track of blood sugar levels throughout the school day.
Here are the steps to creating your own blood sugar monitoring Google Form:
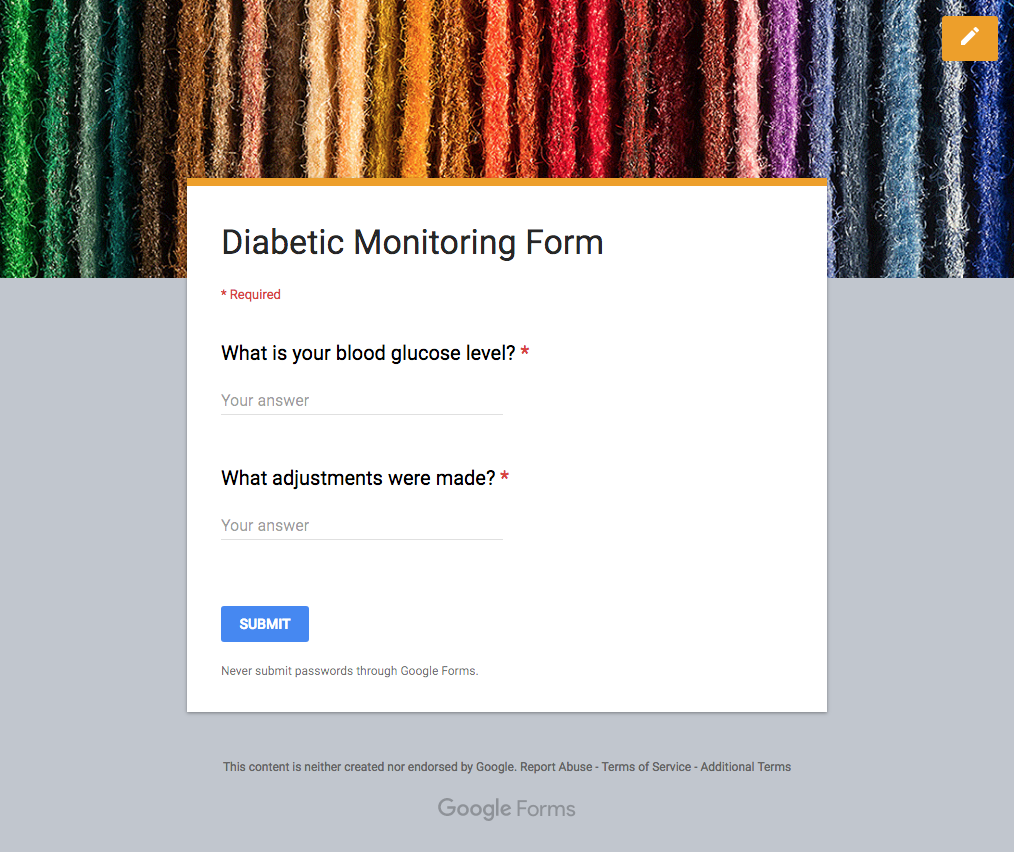
1. Create a new Google Form and collect only the information that is needed. The key to this is to keep the form short and to the point so as not to waste time when a student is recording their information. The two bits of information that the nurse was interested in was the student’s blood sugar level and the corrections that were made to adjust for those levels. Because the Google Form is time-stamped automatically with the date and time, it is not necessary to have the student input that information. (I recommend creating a separate form for each student individually to be sure that each student’s data is being kept separate.)
2. Once the Google Form has been created, the next couple of steps take place in the Google Sheet that records the information collected by the Google Form. Click on the responses section in the Google Form and click on the green Google Sheets icon to link the form to a new Google Sheet.

3. In the form responses Google Sheet, we need to manipulate some of the data that was collected by our Google Form to present it in an email notification that we will be creating in a later step. To use the date and time data in an easier to use format, we want the time to be in to display in the 12-hour format, use the formula shown below. Create a new column called “Time and Date” and insert it into row 2 of that newly created column.
=text(A2,"h:mm am/pm on M/DD/YYYY")
4. This next step we will be using two Google Sheets add-ons:
- copyDown - This add-on allows you copy the formula used in row two to all of the other rows that will be created by each Google Form submission.
- formMule - This add-on allows you to create and send a mail merged email that takes the information collected by the Google Sheets and inserting that information into an email template.
5. Before moving to the next step, enter test data and submit the Google Form. The copyDown add-on requires at least one row of data to work properly.
6. In the form responses Google Sheets, click on the add-on for copyDown. Using this add-on is pretty straightforward. Click on copyDown settings and turn switch to “on” and set the formula row to “2” if it is not already selected by default. It should detect your formula. Click on the “save settings” button to complete the process.
7. The next add-on that we will be using is the formMule add-on. This add-on will allow us to create an email that can be sent to multiple people upon submission of the Google Form. This add-on is a bit more involved than the copyDown add-on but it does a good job of leading you through each step.
8. Click add-ons and select for formMule add-on from the list. Hover over the “setup” and click on “Choose source data and select merge type”.
9. In the first section, select “Form Responses 1” as the source data and set the form trigger to “Send on form submit”.

10. Click on the blue button in the lower left corner labeled “Next: Templates and send conditions”.
11. In this step, leave the unique template set to “1” and you can name your email template. In this example, I named it “Form Notification”.

12. In the bottom right corner, click on the blue “Save template settings” button. Once that is saved, you can then click the blue button in the lower right corner labeled “Next: Edit templates”.
13. In the image listed below is an example of the email template that you might use. This email is HTML friendly so you can use HTML tags throughout the message to enhance your message. Enter all of the email addresses of those who need the notifications in the “To:” box. In the reply box, I put the email address of the school nurse. In the body of the message, you will see that there are merge tags. By clicking on the buttons on the right side, the tags will be placed based on the location of your cursor. The information inside the “<< >>” will be replaced with the data collected from the responses recorded by the Google Form. I used the HTML tag <strong> </strong> to bold the text contained between those two tags.

14. At this point, you can click the “Preview this” button to view your newly created message. If you are happy with everything, close the pop-up window and your form should be working. You will want to do a test run to be sure that all parties are receiving the message. Warning: Be sure to send a message to all parties letting them know that you are testing the form.
Congratulations, you’ve created a Google Form to help monitor a student’s blood glucose levels. I did have a couple of concerns about collecting students medical data, and I did speak to our school’s nurse about my concern. She shared our method with other medical professionals and they said that they felt this was an excellent way to solve this problem. Be sure to consult the parents to be sure to that they approve.
I had a parent that had a preference for a text message over an email. It is possible to convert an email to an SMS message. A guide on how to do this can be found here.
To view a video walkthrough of this tutorial watch the video shown below.
To view a video walkthrough of this tutorial watch the video shown below.

This comment has been removed by a blog administrator.
ReplyDeleteThis comment has been removed by a blog administrator.
ReplyDeleteGreat post
ReplyDelete